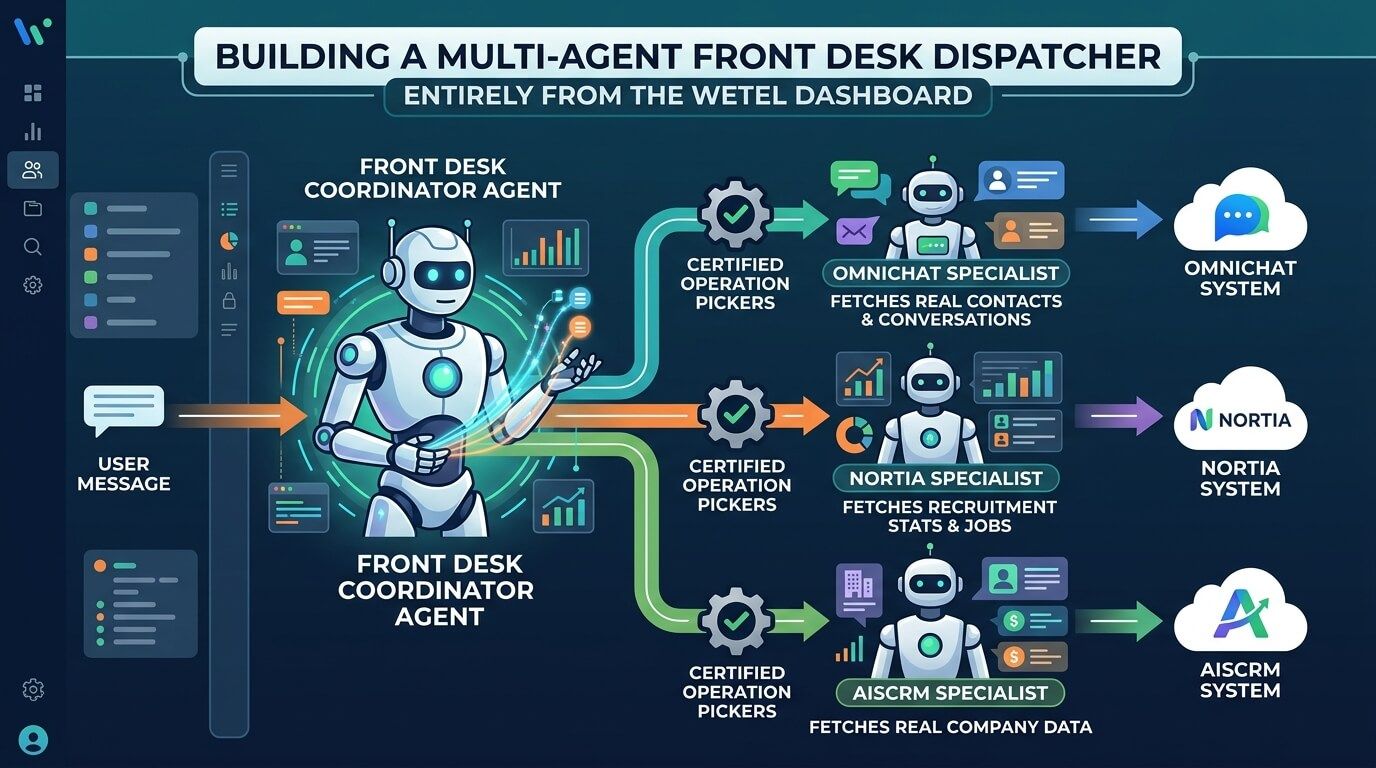
Most agent-builder tools make you choose between “one agent does everything, badly” and “hire an engineer to wire up an orchestration layer yourself.” This post is about a middle path you can build entirely from the Wetel dashboard: one coordinator agent that, on a single incoming message, hands pieces of the conversation to specialist agents at the same time — in this walkthrough, three of them, each reaching into a real, different partner system and coming back with real data, not a canned answer.
If you already run a Multi-Team Routing setup — routing an incoming contact to whichever team is on shift — this is the same idea one layer up: instead of routing a contact to a human agent by shift, the coordinator below routes a QUERY to the right AI specialist by topic.
Nothing in this walkthrough requires writing code. Where the underlying config is shown, it’s there for completeness and for anyone who wants to confirm what a click in the dashboard actually produces — not because you need to write it yourself.
For the full reference behind any of the pieces this walkthrough clicks through, see Certified Operations, the Action node reference, and the Sub-agent node reference.
What you end up with
flowchart TB    User(["End user's message"]) --> Master
    subgraph Master["Front Desk Coordinator"]        direction TB        MStart(["Start"]) --> MDispatch["Dispatch to all<br/>specialists concurrently"]        MDispatch --> MSum["Aggregate specialist<br/>results"]        MSum --> MResp["Reply"]    end
    MDispatch -.-> SubA    MDispatch -.-> SubB    MDispatch -.-> SubC
    subgraph SubA["OmniChat Specialist"]        AFetch["Look up real contacts<br/>(certified operation)"]        AFetch --> ALlm["Answer using<br/>the real data"]    end
    subgraph SubB["Nortia Specialist"]        BFetch["Look up real recruitment data<br/>(certified operation)"]        BFetch --> BLlm["Answer using<br/>the real data"]    end
    subgraph SubC["aisCRM Specialist"]        CFetch["Look up real companies<br/>(certified operation)"]        CFetch --> CLlm["Answer using<br/>the real data"]    end
    AFetch -.->|"real contact data"| OmniChat[("OmniChat")]    BFetch -.->|"real dashboard stats +<br/>job postings"| Nortia[("Nortia")]    CFetch -.->|"real company data"| Aiscrm[("aisCRM")]
    ALlm --> MDispatch    BLlm --> MDispatch    CLlm --> MDispatch    MResp --> UserOut(["Reply to the end user"])
One coordinator, three specialists, each pulling in real data from a different connected system, all at once. Everything below is exactly what was clicked through / built and confirmed working on a real deployment.
Step 1: Create the four agents
In the dashboard, go to Agents in the left sidebar and click New Agent, four times, naming them so their role is obvious the moment you see them in a list:
- OmniChat Specialist — position “Specialist”
- Nortia Specialist — position “Specialist”
- aisCRM Specialist — position “Specialist”
- Front Desk Coordinator — position “Coordinator”
Each agent gets its own id the moment you create it — you’ll need to reference these when you wire up the workflows in the next step, so keep the Agents list open in another tab.
Step 2: Build each agent’s workflow
Every agent needs its own workflow behind it. Open Workflows, create one per agent, and wire the nodes below on the canvas.
OmniChat Specialist’s workflow: Start → Action (certified operation) → LLM (reads the fetched data) → Response → End.
Nortia Specialist’s workflow: same shape — Start → Action (certified operation) → LLM (reads the fetched data) → Response → End.
aisCRM Specialist’s workflow: same shape again — Start → Action (certified operation) → LLM (reads the fetched data) → Response → End.
All three specialist workflows are the same pattern with a different certified operation underneath — full detail on wiring one in Step 4.
Front Desk Coordinator’s workflow: Start → Dispatch node → LLM (aggregate) → Response → End. This is the coordinator — full detail in Step 3.
A wrinkle worth knowing up front if the identity you’re connecting has more than one organization on a partner system: OmniChat/aisCRM credentials that resolve from an end user’s own sign-in need to know which organization to act as, if that identity belongs to more than one. If it’s genuinely ambiguous, the platform correctly declines rather than guessing — so for a specialist using a session-scoped credential, add one small extra LLM node right before the fetch node whose only job is to emit a fixed organization name into a variable (e.g. orgHint), then reference that variable in the fetch node’s own org-choice field. Word that node’s prompt carefully: a vague instruction like “just say the organization name” can get pulled off-task by the surrounding conversation and answer the user’s real question instead — be explicit that this step is not the assistant and should ignore the user’s message entirely.
One easy-to-miss requirement for every workflow you build: click Publish on it, and separately make sure the agent’s own settings point at that workflow’s id. Both steps are required — an unpublished workflow, or an agent not pointed at the right workflow, silently runs zero nodes for every conversation, with no error shown anywhere. If a freshly built agent seems to do nothing at all, this is the first thing to check.
Step 3: The dispatch node — send a message to every specialist at once
Open the Coordinator’s workflow and click the dispatch node. The inspector panel on the right is the multi-target dispatch editor. It reads, roughly: “Every target below runs at the same time, each as its own independent session. One failing or timing out never blocks the others.”
Below that: a Target card per specialist, each with its own Agent dropdown — populated with your tenant’s real agents, not a placeholder list — and its own Opening message field describing what that specialist should be told. Click + Add target twice to bring in all three specialists; nothing about this is capped at two, or at three either.
Set the three targets’ agents to your OmniChat, Nortia, and aisCRM specialists, and leave each opening message set to pass along the user’s own message (the dashboard defaults this sensibly).
The config this produces underneath, for reference:
{ "targets": [ { "agentId": 29, "contextTemplate": "{{userMessage}}" }, { "agentId": 30, "contextTemplate": "{{userMessage}}" }, { "agentId": 32, "contextTemplate": "{{userMessage}}" } ], "resultVar": "specialistResults"}Downstream, the LLM node that aggregates both replies needs to reference specialistResults correctly — in the dashboard’s template field, use {{jsonString specialistResults}} rather than typing the variable name plain. This is a general rule for any node reading structured data from an earlier step, not specific to this feature: a plain {{variableName}} reference to something that isn’t already text renders as a meaningless placeholder string instead of the real content, and the model will confidently answer based on that placeholder rather than telling you something went wrong. Using jsonString is what actually hands the model the real data.
Step 4: The certified operation picker — the part that matters most
Open the Nortia Specialist’s workflow and click its fetch node. This is the node worth walking a technical reviewer through slowly, because it’s the actual mechanism behind “the agent can talk to Nortia” — not a black box:
- Custom action dropdown — pick the connected action for Nortia (e.g. “Nortia Recruitment Insights”).
- The moment that action has a matching entry in Wetel’s certified catalog, a second Certified operation dropdown appears automatically — nothing extra to configure to make it show up. Pick “Dashboard Stats & Job Postings.”
- A read-only preview panel appears showing the exact query that will run — real GraphQL text, already verified against Nortia’s live schema, visible right there in the inspector. Nobody building this workflow wrote it, and nobody needs to know Nortia’s schema to pick it.
- The Arguments field relabels to Variables — you’re filling in the operation’s own inputs, not writing a request body from scratch.
That preview panel is the entire pitch in one screenshot: pick an action, pick an operation, get a verified query and a form for its variables. No GraphQL knowledge, no partner documentation to read, no way to accidentally query the wrong field.
This walkthrough only needs one operation, but the dropdown you’d actually see isn’t a short list — the certified catalog holds 170 verified operations across the three partners as of this writing (73 for Nortia alone), covering most of what you’d want to read or write against each one: candidates, jobs, and company settings on Nortia; contacts, conversations, tasks, and automation rules on OmniChat; companies, deals, and pipelines on aisCRM. Swap “Dashboard Stats & Job Postings” for any of those and the same pick-preview-fill-variables flow applies unchanged. (A small number of the newest Nortia write operations are schema-verified rather than live-execution-verified — the preview panel’s own verificationNote says which; see the full catalog reference if that distinction matters for what you’re building.)
Step 5: Test it
Open the Coordinator agent, click Test Agent, start a session, and send:
Please tell me: how many open jobs does Nortia have, what companies are in our aisCRM, and what contacts do we have in OmniChat?
Within a few seconds, you get back one combined reply summarizing all three specialists — including real, live data from all three systems, not a placeholder. In a verified run, that came back naming 4 real, individually-named Nortia job postings, one real OmniChat contact by name/email/phone, and a genuinely empty (but real, not failed) aisCRM company list for the connected organization; your own numbers will reflect whatever is actually in your connected data at the time you run it.
If someone watching asks “how do we know that’s not just made up” — open Workflow Runs for that session and look at each specialist’s own captured context. The raw JSON fetched from each partner sits right there, and it matches the reply word for word. That’s the actual check, not a reassurance to take on faith. Worth also checking each specialist session’s own start timestamp — dispatched close enough together (well under a second apart) to confirm they really ran concurrently, not one after another.
Something to watch for if a specialist’s credential resolves per end-user
If a specialist’s fetch node uses a credential source that resolves from an end user’s own sign-in (rather than a shared, admin-provisioned connection), that end user needs to actually be signed in — through Wetel’s identity layer — on the SAME session the coordinator is running in, before the dispatch happens. If that link is missing, the specialist declines honestly (no data, no crash, no wrong data either — just an honest “not signed in” outcome) rather than guessing or falling back to a shared credential it has no business using.
One sign-in now covers multiple linked products, not one each. Earlier versions of this walkthrough needed a separate sign-in per product for OmniChat and aisCRM. WebbyX One now supports linking several sibling products in the same sign-in submit — your own sign-in widget calls webbyxOneProductClientIds to see which products are linkable, fires each product’s /sso/login while the password is still in memory, and passes every resulting ticket in one sdkVerifyWebbyxOneIdentity call’s productTickets argument. Every specialist dispatched off that session then resolves correctly, for every linked product, off that single sign-in.
Also worth knowing if you extend this yourself: not every partner connection supports an end user bringing their own login automatically. Some resolve credentials from an end user’s own connection; others (like Nortia today) require a Wetel-provisioned connection with no end-user-level variant yet. Check what’s available for the specific partner you’re connecting before assuming both options exist.
Where to take this next
The pattern here — one coordinator, several specialists, each with its own persona and its own tools — extends past three targets and past three certified partners. Give the coordinator a smarter aggregation prompt that decides what to actually surface to the end user, or have a specialist branch into different certified operations depending on what’s asked. None of that needs new infrastructure — it’s the same dispatch node, the same certified-operation picker, applied again.
If you’re evaluating this from the other side — deciding whether to build a direct integration yourself instead of routing through an agent like this — the deeper, more technical write-up of exactly how the certified catalog is verified and gated, along with the honest limitations, is worth a read: Concurrent sub-agents and a certified GraphQL catalog.
Related reference docs
- Certified Operations (OmniChat, Nortia, aisCRM)
- Action node reference — Certified operations
- Sub-agent node reference
sdkVerifyWebbyxOneIdentityandwebbyxOneProductClientIds— session-level WebbyX One identity linking